7 Chicken Coop Necessities

Before Savannah designed our coop, we both did a lot of research. Years ago we had chickens and our coop was a converted shed. It had all the main components for a chicken coop but it was horrible to clean out. In order to get the eggs, you had to go inside the coop. When we decided to do chickens again, we knew we wanted a coop that was well thought out and easy to use and clean. After much research this is what we came up with. I can say after using it for 5 months, I wouldn't change a thing (except maybe making it bigger so we can get more chickens....hahaha).


1. Vents
This is one of the most important aspects of a coop because it keeps them healthy. Chickens produce a lot of moisture and ammonia. If they don't have enough ventilation this will cause a lot of problems. Ventilation also reduces the heat in the summer. The more vents you can put in the better. The even need ventilation in the winter.


2. A Giant door for easy cleanout
You will thank us for this. Cleaning the coop out takes me less than 5 minutes. I pull my Gorilla cart right under the door and sweep everything right into the cart. Having the wide door makes this whole process so much easier.

3. Roosts
Chickens need and like to roost. Sometimes you might find a chicken trying to sleep in the laying boxes and you just need to place them on the roosts. Ours wouldn't roost for the longest time. They would just all huddle together at the bottom of the coop. We added a second roost that is a 2X4 because they didn't seem to like or use the branch we had in there. Once we did that they started roosting on both of them. I have read that it's not good for their joints to sleep laying down all the time.


4. Easy Access Laying Boxes
This is just a convenience thing. It would be challenging to access our laying boxes from the inside. Also since the coop and the run aren't the cleanest of places, I avoid going in them as much as possible. Being able to just grab the eggs from the outside is quick, pleasant, and easy.

5. Chicken sized door & ramp into the run.
The girls have to have a way to get into the coop. We actually don't ever even close our door because our run is predator proof, but it's nice to have a way to close it especially in the winter time.

6. Raised Coop
This is huge in my opinion and one of my favorite features of our coop. Several years ago when we lived somewhere else and had chickens, we used an old shed as a coop. We had no idea what a nightmare that would be. Cleaning it out was terrible and so we didn't do it very often. The coop being elevated makes everything easier to access. It also extends the size of the run and provides an additional place outside of the coop where the chickens can take cover when it is raining. We also put their food in this space so we never have to worry about it getting wet and moldy.

7. Vinyl Floor
We got this idea from somewhere on the internet and it's one the best things we ever did. This allows the bedding to just slide off into our cart. As mentioned above, I can clean out the coop in 5 minutes. This is largely because of the vinyl flooring. We did the stick on tile which is super cheap and easy to install.

If you hadn't notice, a lot of the necessities revolve around making the coop easier to clean out. Chickens aren't happy or healthy in a dirty coop, so being able to keep it clean is pretty crucial. Happy chickens lay more eggs!


10 Heirloom Seed Companies & Why To Buy Them

Years ago when we first started gardening, we got a seed catalog from a friend and just ordered whatever looked good. We had no idea what we were doing and especially didn't know about different types of seed. I remember seeing "Heirloom" tomatoes in the store and I knew that they looked funky. I also remember that they were so delicious (according to Casey and the general public.) But we weren't necessarily in any hurry to figure out how to grow them. We just wanted whatever we could order right then.

Now, our second time around with starting a brand new garden, selecting seeds is very different for us. I find myself wanting ENTIRELY heirlooms varieties for a lot of reasons. So what are those reasons? Let's chat...


When you buy heirloom seeds you:

1. Get different and unusual varieties with history. Some places will tell you where the seeds originated from, and if you get them from a friend or family member, they can often tell you a story about where the seeds have come from. Plus, you can get some of those more special varieties like vegetables in crazy colors, or unusual shapes- cherry sized cucumbers, yard long beans, and white tomatoes. 

2. Grow fruits and vegetables with better taste. Remember what I said about those tomatoes? Yeah, that's a real thing. If you have ever had an heirloom vegetable or fruit, you know that the taste is superior to what you are used to in the grocery store.

3. Grow plants with more nutrition. They are better for you as they have not been hybridized time and time again. They are also non-GMO which is super important as GMO seeds can have a host of issues and are thought to be linked to several health problems. Here is an article talking about how the nutritional content is lower in fruits and vegetables that are grown conventionally.

4. Can save them and save yourself money! This is a big one for me. All heirloom seeds can be saved by not all hybridized/non-heirloom seeds can be saved for a variety of reason. I love the idea of being able to keep the same plant variety year after year without have to repurchase them every year. And in turn, you can save money! Seed costs definitely add up. So having the option to save seeds at the end of the season opens up more choices for you. Here is a great blog post explaining the different types of seeds.

5. Develop seeds that are better adapted to your land. When you are saving your seeds year after year, you are saving the seeds of a plant that has adapted to your exact land and climate. Whatever plants have done the best are the ones to save.


So where do you buy heirloom seeds? There are plenty of great places online where you can order seeds and have them delivered straight to your door.

1. Botanical Interests
2. Baker Creek Heirloom Seeds
3. Annie's Heirloom Seeds
4. Southern Exposure Seed Exchange
5. MI Gardener
6. Eden Brothers
7. Johnny's Seeds
8. Seed Savers Exchange
9. Sustainable Seed Company
10. Victory Seeds

Another seed option is to join a seed swap. It's a great way to accumulate some cool varieties of seeds and try them out in smaller quantities. We were part of a seed swap this year and we got a lot of seeds that we would have never thought to purchase- hello hibiscus! And this is why heirlooms (and seeds in general) are so fun.


Hot Tub DIY From A Stock Tank Pool

Disclosure: We are not electricians. Please read how we turned our stock tank pool into hot tub at your own discretion. Always use/consult a certified electrician when installing your pool and pool heater. Always disconnect your pool pump and heater from electricity before getting in the water.

Well, it’s the first day of Fall, and folks are starting to shut down their stock tank pools. And while it’s always sad to see summer fade away, I know you are so excited about everything cozy. This is why we are excited to show you how we turned our stock tank pool into a hot tub!

Back in 2018 we turned our stock tank pool into a hot tub, and it was A LOT of work! We rigged up an electrical heater (we literally built the entire thing) and got our 8’ pool up to a nice hot tub temperature. The only problem was that it took SO long to heat up. I think we ran it for an entire day, or two, to reach that temperature. And all the while the tank was letting out heat. Anyway, it’s safe to say that it wasn’t very efficient. It did work though, and some of you may have even seen the tutorial before we decided to take it down this year.

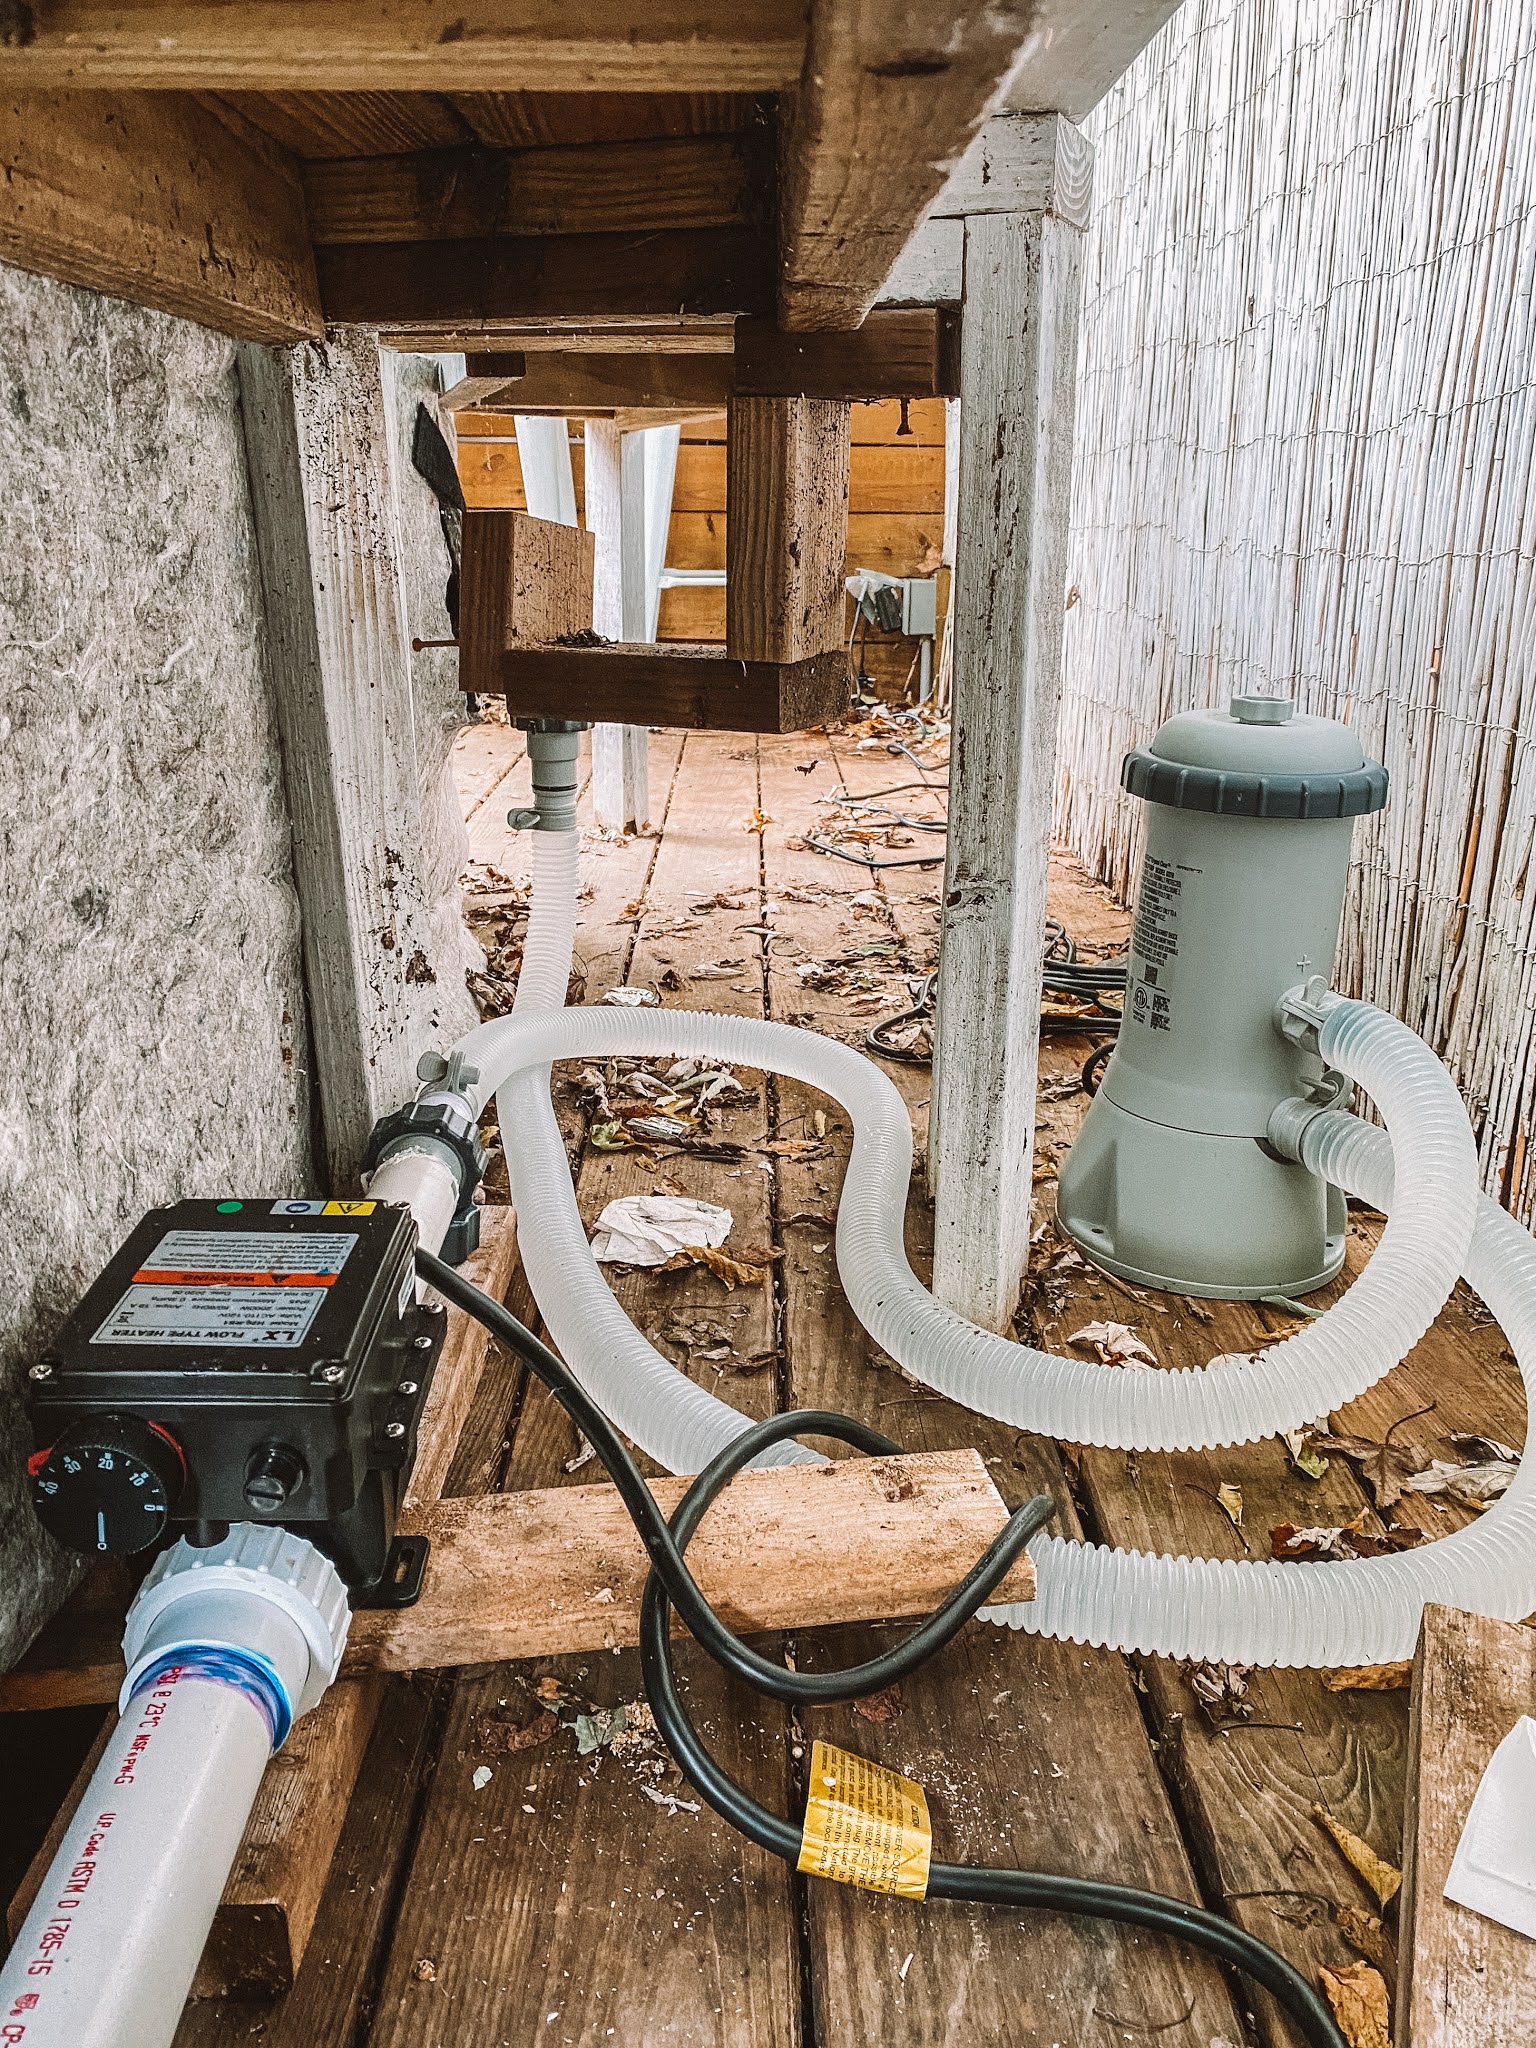
The good news is that we have figured out something better that is pretty simple to put together. We used this spa heater we found on Amazon. It’s very affordable, but it doesn’t have a plug end, which is where an electrician comes in. The heater connects inline to our pool pump hoses and turns on when there’s enough water flow to trigger it.


We are using the Intex 1000 GPH pool pump and it was strong enough to keep the heater on. We read some folks reviews saying they had a pump that wasn’t strong enough, but ours is working perfectly. This means you could use this heater with a 1000 GPH or anything bigger. I would not suggest using a smaller pump.

If you need instructions on how to install the Intex 1000 GPH pump, check out our video by clicking here!

We were very impressed with how fast this heated the water, given our past with heating the stock tank pool. But there is one very crucial thing you must do no matter what you heat your pool with- INSULATE!

Let me tell you, the metal on a stock tank pool is not going to keep the heat inside your pool. It’s going to let that heat out almost as fast as it comes in. We decided we needed to make a koozie or jacket of sorts for our stock tank. To do that we used reflectix, a very thick wool rug pad, and flannel fabric. You don’t have to go this route- there are many ways that you could insulate your stock tank pool. However, you definitely need to do something if you actually want to use your stock tank as a hot tub. You also need a cover. We plan on making an insulated cover, but for now we are draping a tarp over it and it’s working just fine!

We turned our heater off one evening and the water was at 102 degrees. In the morning the water was 94 degrees. This means that this stock tank koozie/jacket situation actually works and is crucial for being able to keep your hot tub water warm. You definitely don’t want to have to heat your water from something like 52 degrees every time you want to use it.

If you don’t want to deal with electric (besides your pump, of course) you can always opt for a gas tankless water heater. This one is a great option as it heats more water faster than other ones and it is specifically made for being outdoors!

Okay, so you probably want to know how I connected this part to our pump, and I will do my best to explain. Please note that these are instructions for using the 1000 GPH pump. I will note how to alter for the 1500 GPH Pump or 2500 GPH Pump. Here are all the things I purchased:

Step 1. Cut your PVC into two parts. I used a mitre saw and my pieces are 10” each.

Step 2. Attach the Type A Hose Adapters to the PVC. These fit on the inside of the pipe. You need one on each piece of PVC. I originally used sealant on to seal these two pieces, but the water pressure was too high on one side. I ended up using JB Weld Marine Weld on that side. I followed the instructions and then put the material on the outside of the adapter and the inside of the PVC pipe and let the pieces cure.

Step 3. (Skip this step for 1500 or 2500 GPH pumps.) Create the extra piece for the pump hose to connect to. I took a Swimline Adapter, cut off the section with the threads with a mitre saw, then sanded the edges. I then took Type B Hose Adapter and cut off the lip on the smaller end. This took some finagling but some wire cutters did the job best. I then fit the Type B Adapter into the Swimline adapter. It’s a tight fit, but I used Marine weld again to secure them to each other.

Step 4. Attach your PVC to the heater with PVC cement. Follow the instructions on the kit. The PVC pieces will fit right into the pieces attached to the pump.

Step 5. Once everything has cured for the correct times, it’s time to attach the heater section to the pool pump. Turn your plunger valves to the locked position. Disconnect the hose from the lower outlet plunger valve. If you have a 1500 or 2500 GPH pump, you will completely remove the hose and replace it with the new heater section. If you have the 1000 GPH pump, you will connect the hose to the extra piece from step 3 and then attach the heater to the plunger valve and the extra piece now attached to the hose.

Turn your pump on to make sure there aren’t any leaks and everything is flowing smoothly. If you heater is connected to electricity safely, it will automatically turn on when your pump flow water through it. So you’ll just sit back and relax and wait for the water to heat.

If you turn your stock tank pool into a hot tub this season, we’d love to see your pics! Tag us on Instagram @stocktankpool for a chance to be featured!