Hot Tub DIY From A Stock Tank Pool

Disclosure: We are not electricians. Please read how we turned our stock tank pool into hot tub at your own discretion. Always use/consult a certified electrician when installing your pool and pool heater. Always disconnect your pool pump and heater from electricity before getting in the water.

Well, it’s the first day of Fall, and folks are starting to shut down their stock tank pools. And while it’s always sad to see summer fade away, I know you are so excited about everything cozy. This is why we are excited to show you how we turned our stock tank pool into a hot tub!

Back in 2018 we turned our stock tank pool into a hot tub, and it was A LOT of work! We rigged up an electrical heater (we literally built the entire thing) and got our 8’ pool up to a nice hot tub temperature. The only problem was that it took SO long to heat up. I think we ran it for an entire day, or two, to reach that temperature. And all the while the tank was letting out heat. Anyway, it’s safe to say that it wasn’t very efficient. It did work though, and some of you may have even seen the tutorial before we decided to take it down this year.

The good news is that we have figured out something better that is pretty simple to put together. We used this spa heater we found on Amazon. It’s very affordable, but it doesn’t have a plug end, which is where an electrician comes in. The heater connects inline to our pool pump hoses and turns on when there’s enough water flow to trigger it.


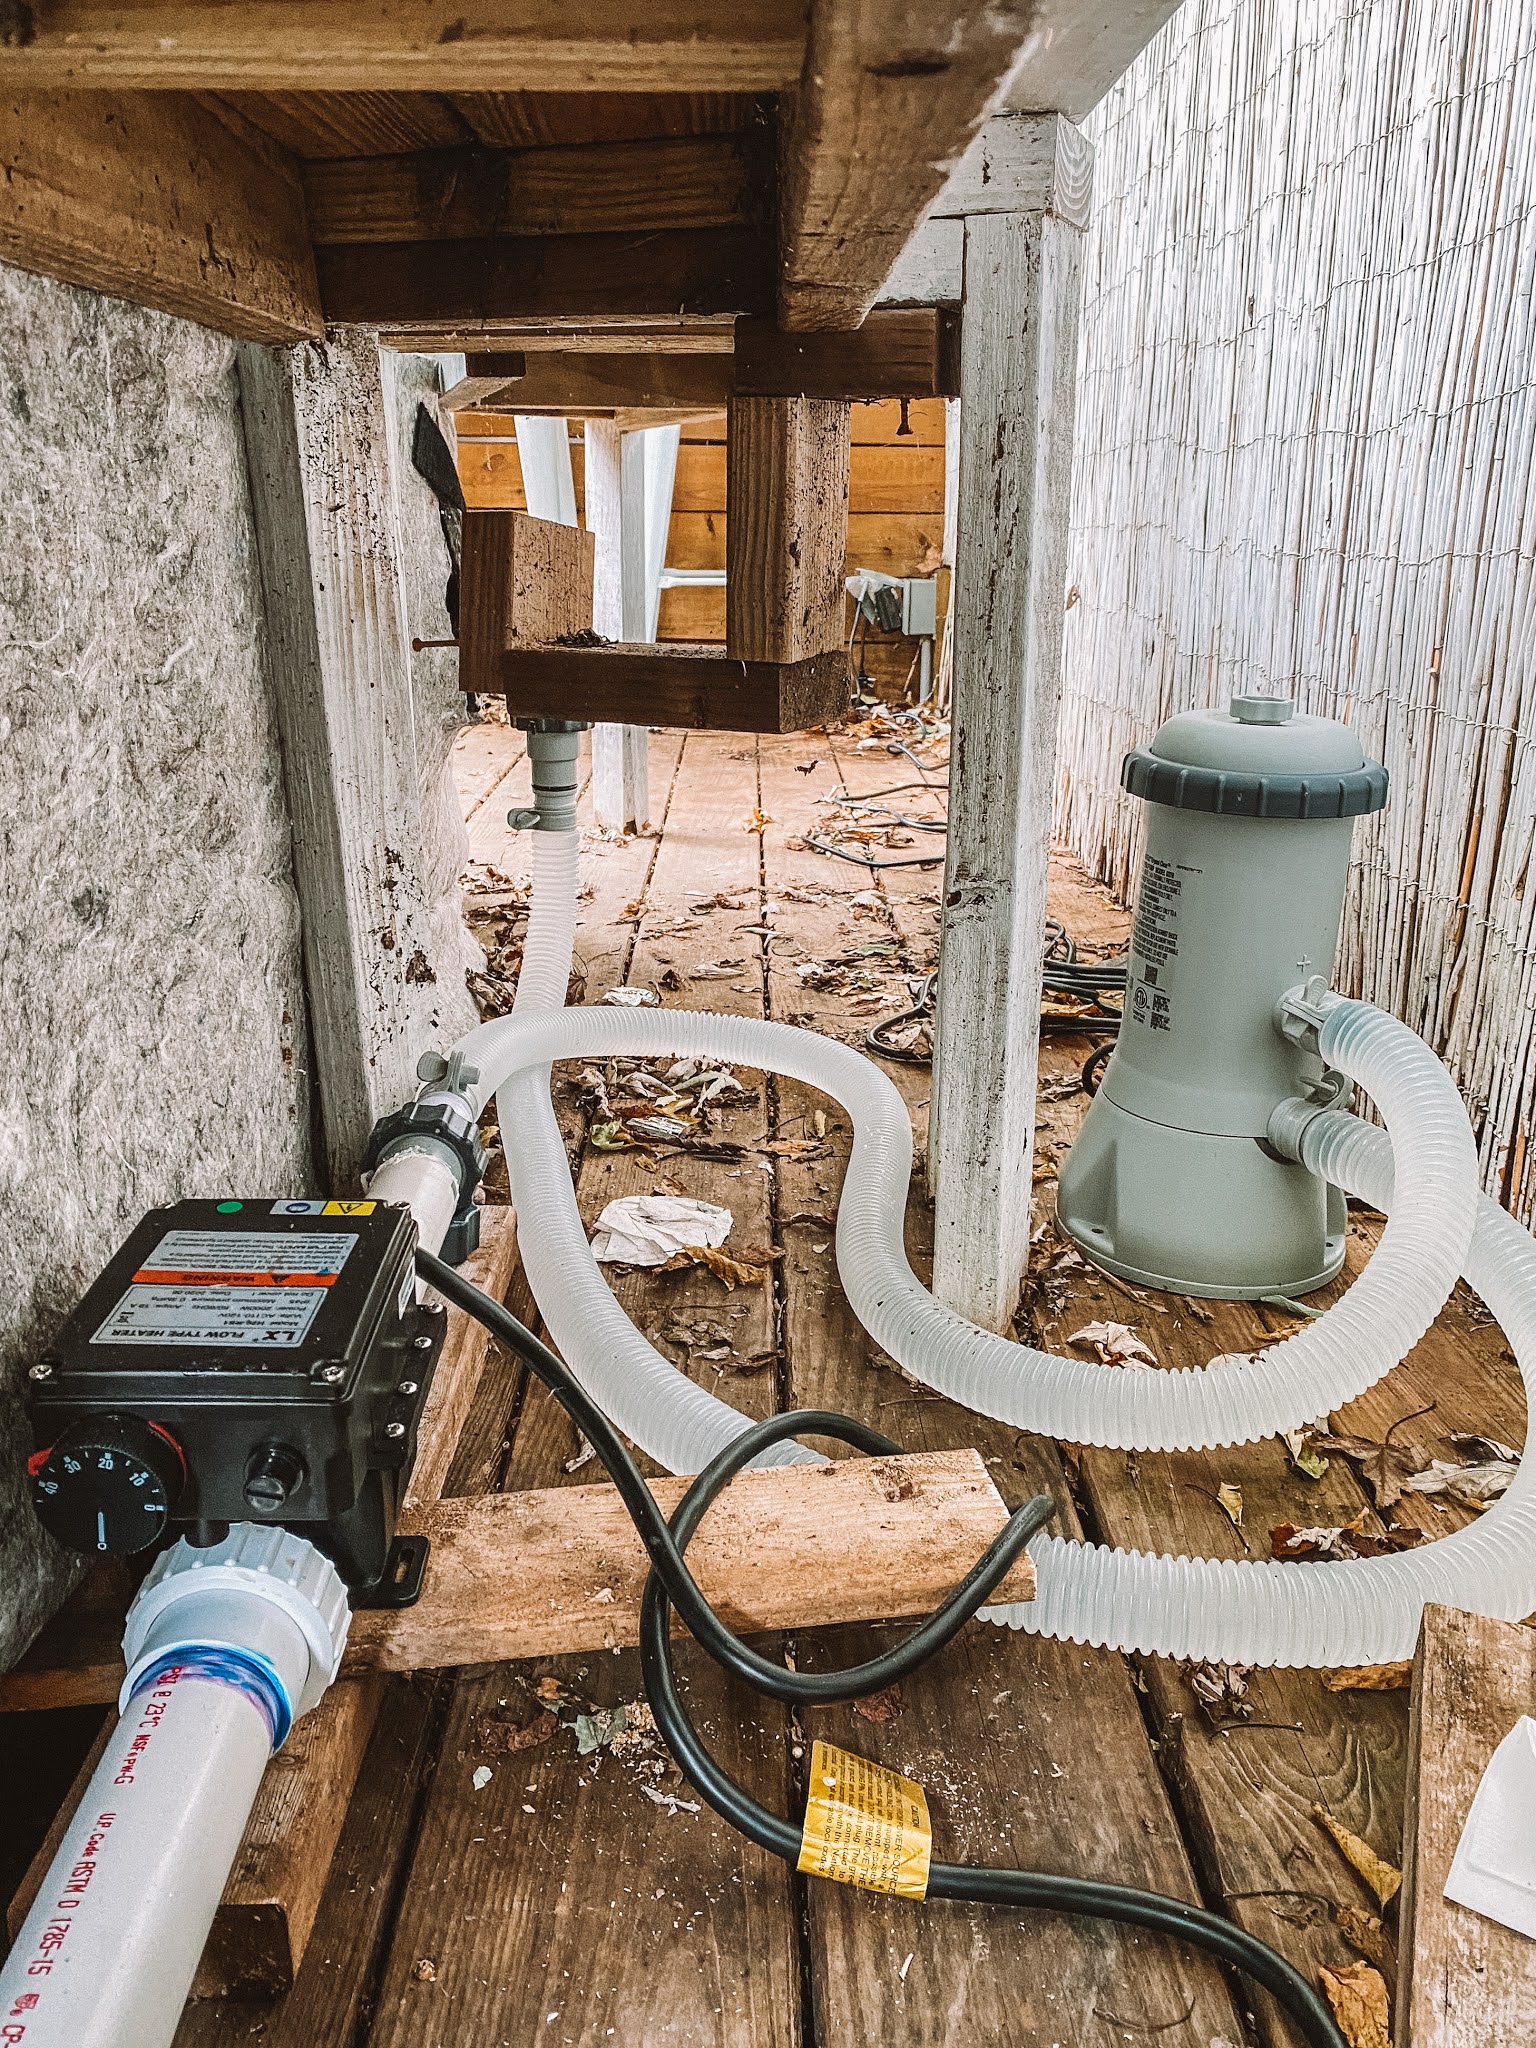
We are using the Intex 1000 GPH pool pump and it was strong enough to keep the heater on. We read some folks reviews saying they had a pump that wasn’t strong enough, but ours is working perfectly. This means you could use this heater with a 1000 GPH or anything bigger. I would not suggest using a smaller pump.

If you need instructions on how to install the Intex 1000 GPH pump, check out our video by clicking here!

We were very impressed with how fast this heated the water, given our past with heating the stock tank pool. But there is one very crucial thing you must do no matter what you heat your pool with- INSULATE!

Let me tell you, the metal on a stock tank pool is not going to keep the heat inside your pool. It’s going to let that heat out almost as fast as it comes in. We decided we needed to make a koozie or jacket of sorts for our stock tank. To do that we used reflectix, a very thick wool rug pad, and flannel fabric. You don’t have to go this route- there are many ways that you could insulate your stock tank pool. However, you definitely need to do something if you actually want to use your stock tank as a hot tub. You also need a cover. We plan on making an insulated cover, but for now we are draping a tarp over it and it’s working just fine!

We turned our heater off one evening and the water was at 102 degrees. In the morning the water was 94 degrees. This means that this stock tank koozie/jacket situation actually works and is crucial for being able to keep your hot tub water warm. You definitely don’t want to have to heat your water from something like 52 degrees every time you want to use it.

If you don’t want to deal with electric (besides your pump, of course) you can always opt for a gas tankless water heater. This one is a great option as it heats more water faster than other ones and it is specifically made for being outdoors!

Okay, so you probably want to know how I connected this part to our pump, and I will do my best to explain. Please note that these are instructions for using the 1000 GPH pump. I will note how to alter for the 1500 GPH Pump or 2500 GPH Pump. Here are all the things I purchased:

Step 1. Cut your PVC into two parts. I used a mitre saw and my pieces are 10” each.

Step 2. Attach the Type A Hose Adapters to the PVC. These fit on the inside of the pipe. You need one on each piece of PVC. I originally used sealant on to seal these two pieces, but the water pressure was too high on one side. I ended up using JB Weld Marine Weld on that side. I followed the instructions and then put the material on the outside of the adapter and the inside of the PVC pipe and let the pieces cure.

Step 3. (Skip this step for 1500 or 2500 GPH pumps.) Create the extra piece for the pump hose to connect to. I took a Swimline Adapter, cut off the section with the threads with a mitre saw, then sanded the edges. I then took Type B Hose Adapter and cut off the lip on the smaller end. This took some finagling but some wire cutters did the job best. I then fit the Type B Adapter into the Swimline adapter. It’s a tight fit, but I used Marine weld again to secure them to each other.

Step 4. Attach your PVC to the heater with PVC cement. Follow the instructions on the kit. The PVC pieces will fit right into the pieces attached to the pump.

Step 5. Once everything has cured for the correct times, it’s time to attach the heater section to the pool pump. Turn your plunger valves to the locked position. Disconnect the hose from the lower outlet plunger valve. If you have a 1500 or 2500 GPH pump, you will completely remove the hose and replace it with the new heater section. If you have the 1000 GPH pump, you will connect the hose to the extra piece from step 3 and then attach the heater to the plunger valve and the extra piece now attached to the hose.

Turn your pump on to make sure there aren’t any leaks and everything is flowing smoothly. If you heater is connected to electricity safely, it will automatically turn on when your pump flow water through it. So you’ll just sit back and relax and wait for the water to heat.

If you turn your stock tank pool into a hot tub this season, we’d love to see your pics! Tag us on Instagram @stocktankpool for a chance to be featured!


How to Paint Your Stock Tank Pool with Plasti Dip

This is a sponsored post written by me on behalf of Plasti Dip. All opinions are 100% mine.

Well, after 4 years it finally happened. We painted the outside of our stock tank pool. This is one of the questions we get asked the most, “how should I paint a stock tank?” Today we’re going to tell you how you can paint your stock tank pool using Plasti Dip. We were thrilled to have the opportunity to try out Plasti Dip products on our tank.

In a nutshell, Plasti Dip is an air-dry, protective, specialty rubber coating and has a lot of uses. It’s flexible, doesn’t crack, and it’s peelable and removable on most surfaces. Some people even paint their cars with it! They have a wide selection of colors to choose from, and they even have glow in the dark colors.

We were happy to give our tank a face lift. Our pool is 4+ years old and on its fifth summer season, so the galvanization has completely worn off. It was looking a little worn and sad. With that said, because the galvanized layer was off, we did not have to sand our tank. If you are going to be painting your tank and it’s brand new, then you are going to first need to sand off the shiny layer. ALL of it.
Here is the design that Savannah came up with using Photoshop. This was really helpful when we were painting the pool because we always had something to refer back to. This step isn’t necessary but helpful.

Alright let’s get on with it!. Read below to find out how we painted our stock tank pool:

Step 1. Get your area ready. We covered up the concrete with brown craft paper so we didn’t get any of the Plasti Dip on the ground.

Step 2. Prep your surface- so what you do here will just depend on the condition of your tank. Everyone should start with a clean tank. You will likely need to sand off the galvanized layer. This process can take some time and you need to sand more than you think. We’ve done this on other pools and it’s not our favorite thing.

Step 3. We first sprayed the tank with a layer of white Plasti Dip. Shop now on Amazon

We actually used 7 coats to get the tank as white as we wanted it. The key with spraying this product is to go more slowly than you want to. If you spray it too quickly, you will not get as much product on the tank. Use slow short strokes. You should wait 30 minutes between each layer before adding another layer.

A blue bowl on a table

Description automatically generated
This was after 2 coats.

A pool table

Description automatically generated
And after 7 coats!


Step 4. After the Plasti Dip is completely dried (we waited 3 or 4 hours) we applied the stencils. We sprayed adhesive on the back of the stencil so it would stick to the tank. We had so many little details in the stencils that this step was crucial.

Step 5. We sprayed the different colors of Plasti Dip according to the design. Savannah was able to layer the paint colors to really customize the colors. She did this simply by spraying thin layers of color over top of each other. If you have stencils that will overlap like ours did, you will want to wait until each design has dried before overlapping another stencil on top of that one.


Step 6. Peel back your stencils and enjoy!

A few notes: We made our own stencils but there are several places that sell stencils you can buy yourself.

Because you are going to ask- can this be used on the inside of the pool? No.

Plasti Dip can be peelable. Tired of your design? You can peel the paint right off. We have not tried this because we like our design and we just did it :) They have another product you can add before you paint that helps make the product permanent. We did not apply this product and I will say, the Plasti Dip does not seem like it’s going to easily peel off. Meaning ours seems like it’s going to stick until we decide we really want to peel it off.

Plasti Dip was easy to work with and sprayed on better than other rubber coating products we have worked with. Get yours at Amazon.

We LOVE the results and are so happy with how our tank turned out. We will update you in the future on how this holds up in the long run.

If you want more stock tank pool information, check out our blog dedicated to this very topic. Also check out our stock tank pool Instagram- @stocktankpool.

We hope you enjoyed this as much as we did!

DIY Easy Kitchen Nook Curtain

You've probably never seen this corner of our kitchen, but it's the one part in here that's evolved the most since we've lived here. It first was a door to the room behind the wall, but then we closed it in. Casey's stepdad then built a hall tree there with a bench. We never used the bench area and desperately needed more storage space so last year we turned it into built a bulit in shelving nook and ever took pics and video to show you how we did it, but to this day we never actually completed the shelves. Classic!

We actually wanted to paint them white and have cute baskets and have everything there organized in open shelving. Thank goodness we didn't actually spend time painting everything because after using this space for a year, we realized that in reality, we cannot keep this space looking neat and nice enough to be on display.

We sure tried, but the things on the shelf move in and out and around so quickly. We decided we needed to be able to use this shelf however we needed for our own sanity. We considered building some doors over the shelves. We never could really figure out how to easily do it without messing up the moulding up top. Also, we needed a solution that was quick and easy, so we decided a curtain would be the way to go!

We decided to go with a plain white curtain, as we didn't really want the curtain to be a feature. We just wanted it to fade into the background and hide the clutter. We wanted it to be like a breath of fresh air. And let me tell you, that's exactly what it has been!

This DIY is simple. To get started, you will need:

1. A Curtain rod. I used a lock seam curtain rod. You could use a spring tension curtain rod if you want to skip the drilling process. However, screwing in the lock seam one will be more secure, which is what we are more concerned with. I don't want to swipe the curtain open and accidentally put the whole rod down.

2. Fabric. I ordered 7 yards and didn't end up using all of it, although I did use most of it. I went with a cotton gauze fabric because it has a natural crinkle to it and will disguise any wrinkling of the fabric. This is one of the fabrics we used to use for kimonos and we LOVE it! I will say, if you wash this fabric, it will crinkle up even more, which is okay! It may seem scary because it will look like your curtain has shrunk. However, if you iron it out it will go right back to normal. If you don't want to iron at all, wash your fabric first AND order way more than you think you need. That way when you wash it, there will be no surprises.

3. Curtain Clips

4. DrillMetal Drillbit, & Screws. Make sure you get screws for the type of wall you have. If you will be drilling into a stud, the screws that come with the curtain rod will work, but if you are going into drywall, get drywall screws. Also, make sure you are using a drill bit big enough for your screws to go through, but not so big that the head of the screw goes through.
Okay let's get started. The first thing you need to do is use your metal drillbit to drill two holes on each side of the curtain rod. If you are using a tension rod you will skip this step.

Before you screw the rod into place, you will need to slide your curtain clips on. I'm using 20 of them. Since we are screwing this into place, you won't be able to slide any of them on once the rod is installed.

Installing the rod is as simple as putting it where you want it to go and putting screws through the holes that you drilled and attaching it to the wall. It was a bit tricky in the nook to get the drill in the right place, but it all worked out.

I'm using wood screws and they went right into the stud in the corner. You can also see here that I installed the rod a little further out than the wall because I don't want the curtain to rest on the shelves or any item that may be sticking out. I want them to slide back and forth freely.

Now, since we are using curtain clips, you don't necessarily HAVE to hem the edges of the fabric. You could simply cut it to size and then clip it up. That would be the easiest route possible. However, I want to be able to wash these and move them around without the fabric unraveling over time. So I measured how long I wanted the curtain and hemmed the top and bottom seam. I left the long sides as they are. I also made two curtains. I wanted there to be enough fabric to really cover up the space.

And they I clipped them up and bam! Everything looks so much neater. We love it. It moves out of the way very easily and closes without fuss. It's exactly what we needed to made this space feel less cluttered.

Check out our Instagram stories to see video of this project!

Where To Buy A Stock Tank Pool

If you look at any of our stock tank pool pictures on our Instagram account or our Instagram account dedicated to stock tank pools, you will notice this is the question we get asked the most. Where can I buy a stock tank? And I get it, if you aren't a farmer, or this idea is new to you, you have NO IDEA where they come from. So we figured we'd write a post all about it to help you find one where you live. Because it largely depends on where you live. 

IF YOU LIVE IN OR NEAR NASHVILLE, TN: WE NOW HAVE STOCK TANKS AVAILABLE FOR PRE-ORDER! CLICK HERE TO LEARN MORE

IF YOU LIVE IN THE NORTHEAST: WE ARE COMING WITH A SMALL LOAD OF TANKS THIS FALL. CLICK HERE FOR MORE INFO AND TO PRE-ORDER
The good news is that even though this summer has made stock tanks scarce, there are more places you can get stock tanks. There's even an online company that will ship them to your door. And it used to be nearly impossible to get stock tanks bigger than 8ft anywhere outside of the Midwest, companies like ours are offering bigger tanks in other parts of the country. 

Okay, so what places can you search for a stock tank in?

Hastings Dealers: We truly believe that Hastings makes the highest quality tanks. We tried almost all of the brands that are out there and there's are the best hands down. We've had a lot of experience with a lot of different tanks. 

Stock Tank Pool Authority (that's us)- We have tanks available out of Middle Tennessee and will deliver up to a 100 mile radius. We also are bringing a small load of tanks up to the Northeast this fall 2020. 

Stock Tank House- They cover most of Florida and sell 8, 9, and 10ft stock tanks. 

Stock Tanks of SoCal- They serve the entire state of California and beyond. 

You can check Hastings website for more dealers here.


Online:

Tank and Barrel- They will ship metal stock tanks up to 7ft to your door. They also sell a variety of plastic stock tanks if that's more your vibe. You might gasp at the shipping charges but it's very challenging and expensive to ship something this large to your door. I've spoken with the owner of this company and he doesn't make a dime off of shipping. He is a logistics whiz, and has this figured out. But that's why Tank and Barrel is the only company that ships to your door- no one wants to do it. 


Tractor Supply
This is probably the most widespread store and where most people get their stock tanks. 

Co-Op
This is where we got our stock tank pool and I just discovered today that these stores are only in the south, with most of their locations in Tennessee. But likely you're state has a similar type of store. When our Hastings order comes in this fall, we will be switching over to that tank. 

Rural King
They have 110 stores in 13 states - their locations are concentrated in the south and mid east.

True Value
From our internet search we could only find that they sold a 6ft stock tank pool, but maybe that's the size you want. Or maybe yours has an 8ft stock tank. Definitely worth giving them a call if this is your most convenient option.

Craigslist
Maybe you'll luck out and find someone selling these on Craigslist. I will say, be on the lookout for rust and leaks when buying a stock tank. You do not want to start out with those kinds of problems.

Farm Supply Stores
Like the Co-Op mentioned above, each state probably has something similar. If you live in a big city, you're gonna have to do a little thinking. Where are the nearest farming areas to you? Google is your friend- so just look up closest farm supply stores. Also, small enough stores might not even have websites, so don't hesitate to give them a call before you head there.

Because stock tanks are used to provide water for farm animals, you are looking for places that sell that type of equipment. So if you live in a big city, you will have a harder time coming by one of these or you'll have to drive out of town to get one.

Once you've purchased your stock tank pool watch the video below on how to install one.


Click here for how to clean your stock tank pool
Click here for how to drain your stock tank pool

9 Tie-Dye Projects & Techniques


Since everyone has a lot more free time these days, it seems people are taking an interest in crafts and DIY projects. Who can blame them? We noticed that a blog post about tie-dyeing from 2014 was trending on our blog which inspired this round up. We give the people what they want! 

We went through a phase years ago where we dyed and tie-dyed literally everything. We loved it. As the years went on we started using less color in our dye projects and even started a clothing company where we hand-dyed all of our pieces.

We said goodbye to our clothing business a few years ago and packed up our many, MANY, dye supplies. So we have been surprised to see how dyeing things has come back in style again. Who would've thought?

We figured we'd bring all of our posts together in one spot so you can explore the many ways to dye your clothes and such! See below.

Supplies you may need:
(these are affiliate links)

- Dye
- Rubber Bands


2. Circular Tie-dye


4. Dyeing with coffee

5. Bleach Dip dye


6. Subtle pattern dip dye

7. Ombre dip dye (Follow this tutorial without the glue)

8. Tie-dye look with Sharpies


What's awesome about several of these DIYs is that you can use stuff you have laying around the house. If you don't have dye, use coffee or use bleach to reverse dye. This is really nice since we can't all just easily run out to the store and get supplies. Since you are stuck at home, you might as well make something! 

Thanks for stopping by :) 

48 Hours In Memphis Travel Guide

I've lived in Nashville for 9 years now and every time I drive back to Texas, I drive through Memphis. But I've never spent any time there! And it's been over 10 years since Casey last visited. That is, until this week. We didn't have any expectations and had a fun couple of days running around exploring the city. Let's talk about the things worth checking out!

WHERE TO STAY
First off, where should you stay? ARRIVE Memphis, hands down. We loved our time at this beautiful hotel! There was definitely a vibe going on. We arrived on a rainy day, but felt so cozy in the room. Every little detail was thought about when this hotel was created.

I mean, can't you see what I'm talking about?

If you decide you'd like to experience this cute place while in Memphis, you can get $50 off a 2 night stay by booking through our link here!

And besides the room, the lobby/bar area is impeccably decorated. In this space they have a coffee/cafe called Hustle and Dough and a bar called Bar Hustle. I had some delicious bread and pastries and of course, Casey had her coffee both days we were there. So definitely don't skip out on these places!

WHAT TO DO
The National Civil Rights Museum. This is joined with the old Lorraine Motel where Martin Luther King Jr was shot and I highly recommend visiting here. Yes, the subject is heavy but the information is displayed in a way that truly honors the Civil Rights movement. You don't leave feeling sad for Martin. You leave feeling inspired. He was one man who walked in the will of God and left a legacy we can all aspire to. Some of the information is hard to take in because horrible things happened, but they did happen. It is crucial to be knowledgable of our nation's past and see its effects so that we can learn from our mistakes. MLK Jr's story and the Civil Rights movement are important. We learned so much from our visit here and I highly recommend stopping by if you are in Memphis.

This is the exact place where MLK Jr. was shot. Right behind the wreath.

Broad Avenue Arts District. We went to this area to eat some breakfast on our way out so we made sure to check out the area. There are also some fun murals on buildings.

We stopped in at Arrow Creative and Falling Into Place, both cute places for gifts and little Memphis memorabilia.

WHERE TO EAT
I know this must be what you've really been waiting for. On this trip we talked about how really when you travel to other cities, you really want to eat a bunch of good food. We did not make it to a BBQ restaurant as it was hard to find a place that accommodated celiacs. However, we found plenty more great things!

First off, dios mio, Longshot. It's a bar that has way above average food and lots of shuffleboard. We even tried our hand at the game, but it didn't last long. We weren't that great, but it was fun to try it out. They make their own sausages (we got one without bread) and have tons of sharable options. We got queso and onion dip and nothing disappointed. Oh and we both got a specialty cocktail- just go here. It's a whole experience worth having.

Bedrock is a fully gluten-free restaurant, but it's waffle selection makes it great for any person who loves breakfast. They have 20+ varieties of waffles! Casey was in heaven. I went the savory route and got a sausage and gravy waffle, while Casey followed her sweet tooth to a creme brulee waffle. She brought home a sausage, egg, and cheese biscuit that was as big as your head. Fully worth it even if you aren't a celiac.

The Liquor Store. This place had a great basic breakfast, but let's be honest, we came for the decor!


This was a fun little trip and we can now say that we recommend Memphis as a place to visit. Especially if you live nearby! We love taking little trips that are in driving distance from Nashville and this is the perfect place for that. If you decided to check it out, don't forget that you can get $50 off 2 nights at ARRIVE Memphis if you book through our link. Happy travels!