the DIY FAVES

So, Savannah and I are becoming aware of your DIY love, so expect to see more of that here. We will have makeup & hair tutorials as well as clothing, jewelry, and home DIY projects. We are excited to share these with you so be on the look out. In the meantime, here are some of my favorite DIY projects. Hope you enjoy!

the PALLET DAYBED - I loved this so much I made one myself and you can see it here. The details for the instructions come from ashleyannphotography.com.

                                                              Source: ashleyannphotography.com via ohsoprettythepins on Pinterest


the HOODIE - I haven't made this yet, but I really want to do so. I have a hoodie problem and that's all I want to wear for fall and winter (but I resist the urge). Get the instructions from see kate sew.

seekatesew.blogspot.com


the UNSTRUCTURED SCRAPBOOK/ JOURNAL - I don't know if you're like me, but I never really got into scrapbooking. I love all the scrapbooking materials (especially the paper), but wasting a giant page for one photo and loading it with little trinkets never did it for me. Anyway, this is a great way to store ticket stubs, postcards, pictures, etc, and there isn't a lot of structure to it which is why I think I love it so. Thanks Monika Wright for this great idea.

iloveitallwithmonikawright.com


the SMOKEY EYE - This eye makeup looks amazing on everyone, and by far is the most sought after eye makeup style. I've used this exact tutorial on myself and on friends and the results have always been great. I don't pay much attention what she (Sam from the video) uses for the lips and I go for a pinky nude lip. If you want great makeup tutorials then check out videos at Pixiwoo.

Pixiwoo


the DIY NO SEW TEE - This is another DIY project I've been wanting to try for entirely too long. It looks so simple and the end result is so cute. I bet you could find some knit sheets (it's important you use knit fabric for this) at Goodwill and make this for supa cheap. Full instructions at happytogethercreates.com.

happytogethercreates


the PILLOW - I used the envelope pattern to make my mom some pillows for Christmas. I painted some letters on hers, so we will be posting a tutorial on how to make those in the future. In the meantime, this is the best way to make a pillow and the options are limitless. Instructions courtesy of madiganmade.com.

madiganmade


the BUN - True story here. Until two weeks ago, I was convinced I couldn't really wear my hair in bun. Then, I found this tutorial from thebeautydepartment.com. My problem was 1) I wasn't teasing my pony tail 2) I was wrapping the pony tail too tightly around the base. This is a really popular way to wear your hair these days and is great with a headscarf as well. Perfect for the day you should wash hair but are too lazy (Savannah and I never do that. Ha!).


I hope you are inspired. What are some of your favorite DIY projects that you have done yourself or found on the internet?


the DIY: TWO-TONED NAIL

 I found this inspiration board on kathyromero.com and it
inspired the color combination of this nail tutorial.


I had so much fun doing the Chevron Nail Tutorial, I decided to try a new design (which just happens to be a little simpler). I still used the tape method but it only takes about half the steps. Hope you enjoy!

Step 1: Always start with a clean and filed nail.
Step 2: Paint all of your nails with a color of our choosing. Here I used "Marine Blue".
Step 3: When the nail polish has completely dried, take a piece of tape and place it diagonally on the bottom part of your nail.
Step 4: With another color of nail polish, paint over the open nail and tape. I used a shimmery navy.
Step 5: Slowly remove the tape. Repeat on all nails.
Step 6: When it has dried completely again, paint a top coat on your nails.
THE END. Pretty nails!

Don't forget to become a follower of our blog and check out our giveaway here for a chance to win free Mac products!


the LAST MINUTE GIFT

Well it has come down to Christmas Eve and you have just realized you forgot to buy a gift for someone! Or maybe you just haven't been able to find something that is just right for that person. Well Casey and I are both in this situation on this very day and we know exactly what we will be doing- making coasters. Check out this tutorial on www.hostessblog.com which is exactly the technique we will be using. Hope everyone has a Merry Christmas and don't forget to enter our giveaway that expires on Dec. 31 at 5pm!


DIY Mod Podge Tile Coaster Tutorial
**See the full tutorial here--  www.hostessblog.com


the DIY: CHEVRON NAIL

Have you been on Pinterest lately? It's THE place to find pictures of super intricately designed nails, and honestly, it depresses me about my unpolished fingers. So, today I decided to do something about it. I'm sure you all enjoy the chevron print as much as we do so I decided to give that a shot...on my finger nails. Here is the tutorial on how I did it.
DIY: the CHEVRON NAIL


You will not need any "special" tools, just scissors, tape, and 2 different nail polish colors of your choosing. Here I have used red and a shimmery beige.

Step 1: File your nails just to make sure each one is symmetrical.
Step 2: Apply a base coat.
Step 3: Apply nail polish in the color you want the middle stripe to be.
Step 4: Tear off a piece of tape, make sure it is quite wider than your nail.
Step 5: Cut a triangle shape into the tape from the bottom of the tape (keep both parts of the tape).
Step 6: Take the top piece of the tape and place it over one nail (make sure your nail has completely dried). Make sure the tape is completely sealed to your nail so the polish doesn't seep underneath the tape.
Step 7: With the other nail polish, paint over the space and tape.
Step 8: Very slowly remove the tape. Repeat on all nails.
Step 9: Take the "bottom" piece of tape and place it over your nail (after it has completely dried).
Step 10: Paint the top of your nail and over the tape as well.
Step 11: Very slowly peel off the tape. Repeat on all nails.
Step 12: Paint a clear coat on all your nails and voila! Chevron nails.


the BEAUTY MUST HAVES (EYES)

From time-to-time my friends, knowing I'm a lover of make up, will ask me what brands I like and would recommend.  So, I will be doing a series of posts of the beauty products that I use regularly and are my favorites.  Today, I will focus on products for the eyes. This is the feature I play up the most and (I think) has the most impact on your overall look. I determine what other makeup I will wear based on my eye makeup.

the EYE PRIMER- There are lots of different types of this stuff and I've tried a lot of them. They make a huge difference in how long your eye shadow will last and it prevents creasing.

MAC paint in Bare Canvas for $17.50
**  If I told you to buy one thing off of this list, this would be it. This stuff will make your eye shadow stay on for days (don't do that though.  wash you face nightly :)) and will prevent creasing. This will last forever too because you use a tiny amount.


the EYE SHADOW - Lots of people have success with drugstore eye shadow, but I am not one of those people. I find I have to use a lot more to get the desired color.

MAC eye shadow in Satin Taupe for $15.00
** This particular color is universally flattering. I love just about all of their eye shadow colors but if I had to recommend just one, this would be it. This color is great for a smokey eye & can be used in the crease or all over the lid (minus the brow bone- never do that).

Make Up Forever in #9 and #75 for $19.00 each
** These eye shadows are phenomenal and come in colors that I've never seen anywhere else. The two colors I recommend are not for the faint of heart, but they really are great colors. If you aren't feeling too brave, then line your eyes with them for a vibrant pop of color. The color shown in the picture is not one of the colors I recommended (though it looks nice).

MAC pigment in Vanilla for $20.00
** This will last forever and is absolutely gorgeous. If I'm lazy, I will sweep this over the entire lid from eye lashes to brow bone and will line my eyes in a bright color (like the 2 colors mentioned above). Of course, I add mascara too, but that's it.

the EYE LINER - If I had to leave the house wearing only one makeup product, I'd punch the person who was making me do that and then I would put on foundation and eyeliner :) Those are 2 products I cannot live without.

Make Up Forever Aqua Eyes in 0L for $18

** I have tried zillions of eye liners and right now this is my favorite everyday eye liner. It's really black & glides on easily. Most importantly it doesn't smudge. Also setting your eye liner with eye shadow will help it last longer and not smudge. 

Clinique Brush On Cream Liner in True Black for $15.00
** Sometimes I like to wear a cream or gel eyeliner and this is the best I've found so far. It comes with a brush that actually works pretty well (I will do another post on make up brushes). This liner is great for a more dramatic eye liner look and to make a cat eye, and it stays on well.

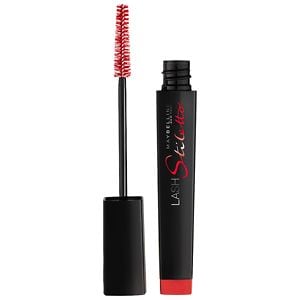
the MASCARA - Back in the day I would have told you that this is a product that is what I would choose to wear if I could only wear one or two products for the day. While it may have slipped to my #3 most crucial make up, it is only slightly behind foundation & eye liner (I look like I'm dead if I don't have eye liner on). However, mascara makes a massively huge difference and I do wear it daily (except for the days when I am temporarily insane and forget to put it on and realize half way through the day & I realize something isn't right).

Maybelline Lash Stiletto in Very Black for $7.49
** I have tried so many different brands of mascara and there are some crap ones out there. Lancome Definicils and Dior Show are probably my all time favorites, but this stuff is so much cheaper and I really like it enough to not bother spending the extra money on the more expensive brands. 

the FALSE EYE LASHES - Just say yes! You can do it. I promise. I went through a period where I wore these nearly every day because once you start wearing them, looking at your naked eye lashes will shame you. Realistically, they are great for a special event.

Ardell Wispies in Black 
** You can buy these at Kroger or Walgreens for around $3 or $4. There is absolutely no benefit to buying expensive eye lashes unless you want some more adventurous eye lashes that have feathers & glitter (hey, there is a time and place for those).

Ardell Lash Grip but DON'T buy waterproof
** The most popular brand of eye lash adhesive is Duo, but I hate it. It takes an eternity to dry. I really like this brand, but don't buy waterproof unless absolutely necessary. Waterproof adhesive is just more tricky to use.  However, if you are going to bawling your eyes out, then by all means go for it.  The whole trick to wearing false eye lashes is letting the glue dry a little before putting them on. The glue should be a little tacky and not completely wet. 

Well, I hope this helps and look for more beauty must haves to come! 


What are your favorite beauty products for the eyes? What can't you live without? Help a sista out because I'm always looking to try something new.