the DIY: LEMON SUGAR SCRUB

If you are or are going to need a last minute gift, this is a great idea! This sugar scrub is quick and you probably already have everything you already need to make it. Use it on your hands, elbows, or any rough spot where you need a little exfoliation. It's also edible...? That's not necessarily good or bad but let's just say I used this stuff on my lips and... it's was real nice.

All you need it some white sugar, olive oil and lemon extract. Here are the measurements we used:
-3 Cups White Sugar
-1 Cup Olive Oil
-1 Tbs. Lemon Extract (add more if the scent is too subtle)

Mix it all up in a bowl. Of course, you can make these measurements smaller or larger depending on how much you want to make. This recipe filled up 6 of our little jars.
We cut card stock circles to fit in the jar lids and just hand wrote on top. You could print out the words if you would like.
This probably took about 20 minutes from start to finish. Literally. So easy and it makes your hands feel so soft!

the DIY: FABRIC BOW GARLAND

We want to make all of our Christmas decorations this year so within the next week you should be seeing a few more tutorials on the subject. If you don't, it's because we failed miserably. Anyways, we visited our Goodwill to grab a bunch of different fabrics. If you need fabric but don't need much, make sure to check your Goodwill. We always find cute patterned clothing, sheets and even pieces of fabric.
This is all the fabric we got for our decoration projects. As you can see by the tags, these are all just pieces of fabric, they are actual articles of clothing and such. We're going for a vintage-y toned-down-ish Christmas color vibe.
Cut strips of your fabric. These strips are about 1.5 inches wide and at least 18 inches long. Some pieces are longer than others.
Tie your strips into bows. Just tie them as you would a shoelace. They don't have to be perfect.
You can see how these bows are all different shapes and sizes.
Tie knots every 6 inches or so on a piece of yarn. Your yarn can be any length and size you'd like- we used a pretty thick yarn. 
Use a hot glue gun to attach the backs of the bows to the knots on the yarn.
So simple and easy and super cute!
We will probably make a few more of these garlands. They will either go on the tree or draped around the living room on the walls. We haven't quite decided yet! Where would you hang this cute garland?
Follow Goodwill on Facebook and Twitter!

the DIY: FIX YOUR FRINGE

So my mom gave me this boots as a gift and I absolutely love them! They are Minnetonka and I had wanted them for a while and yay now I have them BUT, when they came in, the fringe looked sooooo nutty. This is only because when fringe is all squished in a box and being shipped, it tends to form into whatever shape it's laying in. Anyways, it's a super simple fix so if you have or may have the same problem in the future, here's what you do.
Another picture of the fringe with a mind of it's own.
Lay your boots on a flat surface, making sure the fringe is laying flat on both sides. I did this by holding the boot horizontally level with the table and sliding it onto the table starting at the top of the boot. Flatten out the fringe on the top as well.
You will need to lay down a sturdy flat surface directly onto the boots and then top it with a heavy item or multiple items. I used my laptop and a bunch of magazines. Leave this for at least a day.
After a day (or longer), roll up a magazine and drop it in your boot to help it stand up. When you aren't wearing your boots, store them standing up. This will help the fringe to continue to keep flat and stay uniform.

This is something that is good to do when you've just gotten your boots. The more you wear your boots, the more the fringe will fall!

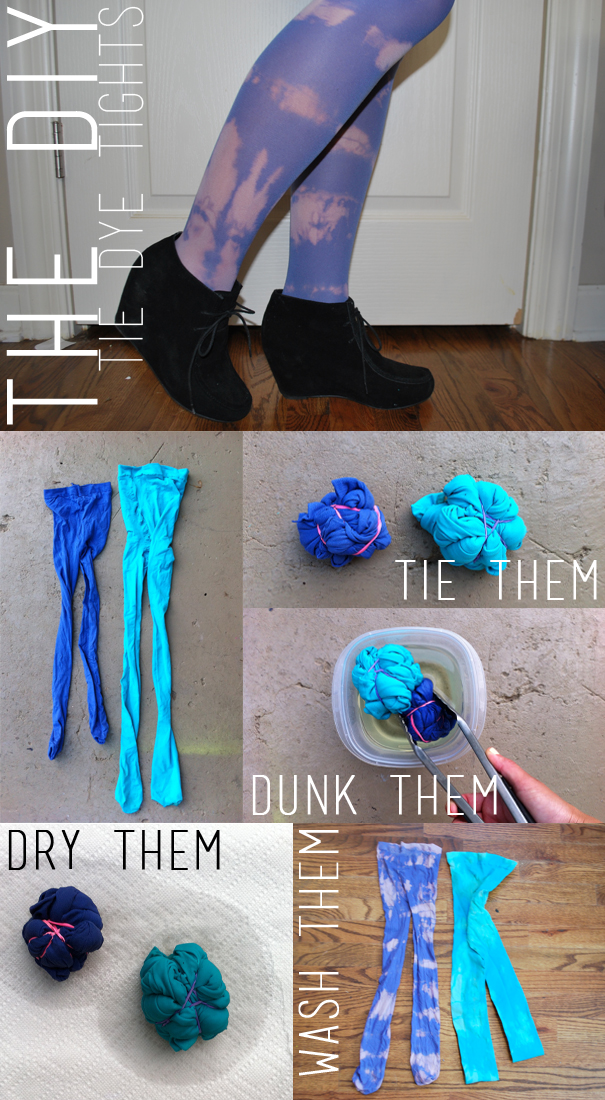
the DIY: TIE DYE TIGHTS

We had these tights for a while that we weren't wearing and weren't doing anything with so we decided to try to tie dye them with bleach. We basically try to use bleach to do anything. Anyways, this is a super simple tutorial. You could do it to ANYTHING. Well, fabric based things. Here's what you do...

1. Crumble up your tights and tie them up with with rubber bands.
2. Dunk the tights in a bowl of bleach. Make sure every part of the fabric is being drenched in bleach. Let them sit for about 30 minutes.
3. Set the tights out to dry.
4. Once the tights have dried completely, wash them as you normally would and wear them!

eat THIS: FARMERS BREAKFAST

So I'm home in Texas right now and my family loooovvess eating breakfast for dinner. But, who doesn't? So we made this from one of my mom's cookbooks- Taste of Home Breakfast and Brunch but we altered it a little bit. Now, you may need to do 8 rounds of P90X after you eat this but, it is delicious and simple!

You will need:
6 strips of bacon
2 tbs diced onion
4 medium potatoes, already cooked
7 eggs, beaten
1/2 cup shredded cheddar cheese
Salt and Pepper


Cook the bacon until crisp.

Put the finished bacon on a paper towel.

Chop it up once it has cooled.

Keeping the bacon drippings in the pan, throw in the potatoes and onion until they brown, about 5 minutes.

Pour in the eggs, cook and stir until the eggs are set. Season with salt and pepper.

Sprinkle the bacon and cheese on top..

And cover with a lid to melt the cheese quickly.

Cut and serve! So yummy and only 5 ingredients. Perfect for your "breakfast for dinner" dinner!

the DIY: SUBTLE PATTERN TEE

So we wanted to spice up this plain white tee that Casey got for super cheap at the Gap. We also had been wanting to try to make a watermark tee so that's what we did! It didn't come out exactly like we had hoped but one day we will try again. I have already worn the final product already because I did actually like how it turned out, even though it wasn't exactly what we wanted. See how we made the subtle pattern below! You will need a blank white shirt, blue gel glue and some dye.
Start by soaking your shirt in cold water and ringing it out. Place something in between the layers of the shirt to prevent the glue from leaking through. We used sheet protectors!
You could squeeze the glue right out of the bottle onto the shirt and create designs or you can use a paint brush like we did. The glue wouldn't come out like we wanted straight from the bottle.
Start making any designs or words on the shirt with the glue.
You can see a little here how our designs looked when we were finished. Now you have to let the shirt dry completely.
Photobucket
 Mix your dye bath follow the instructions on the box or bottle but, use cold water. The way we did this was we took a very small amount of hot hot water and mixed the dye in it until it dissolved. Then we mixed that mixture with the rest of the water required but, we made sure that water was cold cold cold. We wanted to use two different dye colors and make a sort of ombre effect. We put one end of the shirt in a hot pink dye and one end in a golden yellow color and let it sit as long as it was supposed to.
Photobucket
Rinse the shirt out and let it sit in soapy water for at least 15 minutes. This should remove any glue on the shirt. Then wash and dry the shirt as normal.
Photobucket
As you can see, the glue didn't prevent the dye from going into the shirt as much as it should. Could be the paint brush technique. But now we call this our subtle pattern tee! It works! Just not what we expected.
Photobucket
DSC_0172

the DIY: HOLIDAY GIFT TAGS WITH MARTHA STEWART PAINTS

DSC_0193
Today we are making holiday gift tags with Martha Stewart Paints. I love making things and decorating for the holidays that aren't just red and green. Don't get me wrong, sometimes red and green is necessary and fun but, I tend to lean towards more natural textures and neutral colors.
PhotobucketDSC_0177
For this tutorial we are using Martha Stewart Paints and Stencils, some card stock, some baker's twine and Martha Stewart's sponge daubers. The stencils we are using are adhesive stencils and also the greatest things ever invented. The reason I don't use stencils very often is because they slide around and get all messy. These stencils stick right onto almost anything you want to stencil.
Photobucket
We used a blank card (made out of card stock) because it was the color we liked best.
Photobucket
Use a ruler to draw lines vertically and horizontally on your card stock. We made our tags two inches wide and three inches tall.
Photobucket
Cut along the lines.
Photobucket
We ended up with for tags.
Photobucket
Cut one corner off diagonally.
Photobucket
Flip the cut-off-piece over and line it up with the other corner.
Photobucket
Snip along the line.
Photobucket
Punch a hole in the middle and top of the tag.
Photobucket
Pull off your stencil and stick it into place on the tag.
Photobucket
Sponge paint onto the stencil. (These sponge daubers are the best thing ever for stencils.)
Photobucket
Peel off the stencil and wash it right away. What a lovely design!
Photobucket
Stamp the rest of your tags as you wish.
Photobucket
Cut some baker's twine and tie the two ends together. I cut a piece about 10 inches long.
Photobucket
Slip the knot through the hole on the tag.
Photobucket
Put the knot through the loop.
Photobucket
And tighten.
Photobucket
Done! Now all you need to do is fill the tags out and use them.
DSC_0194
Follow Martha Stewart Crafts:
Facebook
Twitter
Pinterest

Find my post disclosure here.