Showing posts with label fashion. Show all posts

before and after: goodwill dress alterations

Just wanted to share a project with y'all. Goodwill may very well be one of my favorite stores ever, and no this isn't a sponsored post. I just love Goodwill. Because you can buy awesome things there for low prices and you can buy not-so-awesome things and turn them into something you like way better. Listen, I'm not judging the before dress, the pattern is lovely, the shape is just not my flavor. When I saw this dress for half-off, I knew it had to be my next Goodwill alteration project. I knew I wanted to shorten it and cut the sleeves off, although now I think keeping the sleeves on might've worked too. But it was certainly touch and go for a little bit in the alteration process. Even though the end result is so simple, it was a pretty tough alteration. Things just weren't hanging right for a while, but in the end it all worked out! I leeeeerrrrrv this dress so much. I will definitely be wearing it as much as I can before summer's end.
We have an outfit post coming up soon featuring this dress so keep a lookout for it in action!

xo, Savannah

the diy: beaded macrame bracelet

 photo dcd4cc93-5eec-4756-8021-695d418af01f_zps050ecc57.jpg
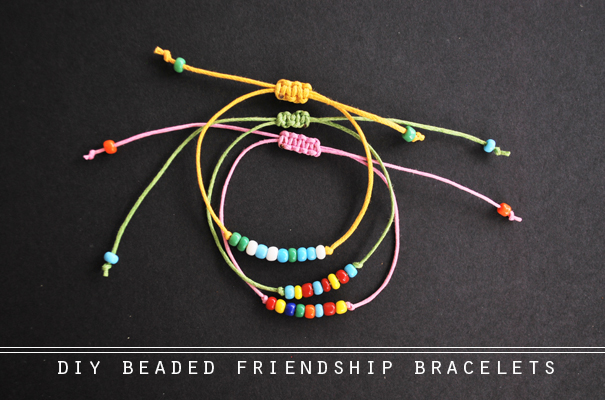
This bracelet turned out way nicer than I had hoped for. The gold beads make it seem like more than just a "friendship" bracelet. But, it really is just a fancier version of a friendship bracelet. All you need is braiding cord and some small geometric beads. I'm sure regular beads would work too.
 photo DSC_0941_zps5030f47b.jpg
Fold a piece of string in half and tie a knot by the fold, leaving a small opening for later. The string should be about 2 feet long.
 photo DSC_0942_zps28cc912d.jpg
Secure your string with some tape or a clipboard.
 photo DSC_0943_zps913eb444.jpg
String some beads onto the left string. I used 17 beads but, the number of beads you use should depend on the size of your wrist. More beads = bigger wrist. Less beads... you get the point right?
 photo DSC_0944_zpsda76ceed.jpg
Tighten the two strings and tape them down. I taped mine to the back of the clipboard.
 photo DSC_0946_zpsc2d6a05d.jpg
Cut another piece of string about 4 feet long. Tie it in the middle onto your two taped-down strings, above the beads.
 photo DSC_0948_zps90e1213f.jpg
You will tie a square knot between each bead. So start off by tie a square knot. You basically are tying a knot forward (or to the right), and then tying the same knot backward (or to the left).
 photo DSC_0949_zps357f9e66.jpg
After you've tied one knot right and one knot left, slide a bead up the string, right up against what you've just tied.
 photo DSC_0950_zps518f6894.jpg
Tie a square knot under the bead. Remember, a square knot is really two knots- one to the right...
 photo DSC_0953_zps48e8cbe7.jpg
and then one to the left.
 photo DSC_0954_zps0061abd8.jpg photo DSC_0955_zps9d6c2213.jpg
Alternate back and forth, one square knot, one bead, until you have made the bracelet as long as you need it to be to wrap around your wrist.
 photo DSC_0956_zps6cffeb3e.jpg
Tie a regular knot with all of the string.
 photo DSC_0958_zps195d5169.jpg
Cut off the excess string!
 photo 2cc974ca-4b57-470e-b457-20d989f9d27a_zpsf5664eee.jpg
And now you have a bracelet that will easily go on and off your wrist.
 photo e9ac47b1-75c4-4e7e-94a6-c0611de17e32_zps9b8c14af.jpg

the diy: beaded friendship bracelets

I was inspired yesterday to make a bunch of bracelets but I only successfully made these guys. But, I really like how they turned out! They are super simple and quick and they could be customized in many ways. And you can give them away to your friends without feeling like your giving your soul and hours of hard work away with it. You know, those regular friendship bracelets are so cute but geez, can I get my day back? Anyway, here's what you do...
 photo DSC_0492_zpsb2627756.jpg photo DSC_0494_zps40fc5673.jpg
All you will need is braiding cord and a few smaller beads. You basically need a bead that is big enough to easily slide on the cord but, still small. Cut a piece of thread about a foot long. Tie a knot close to the middle of the strand.
 photo DSC_0495_zps3a90ca1f.jpg photo DSC_0498_zps99ffa49e.jpg
Slide the beads on in whatever order you would like. I used 8 beads. Tie a knot on the other end of the beads. Overlap the ends of the strands around each other.
 photo DSC_0499_zpsc08163ef.jpg photo DSC_0500_zps8e3fc61e.jpg
Cut another strand of cord and wrap it around the overlapped strands. Tie a forward knot to start.
 photo DSC_0501_zps2eb581e7.jpg photo DSC_0502_zps5737b902.jpg
Then tie a backward knot.
 photo DSC_0503_zps6aea0113.jpg photo DSC_0506_zps4c15c94b.jpg
Alternate back and forth about 8 times. Snip the ends off and burn them with a lighter.
 photo DSC_0509_zpsec120f14.jpg photo DSC_0510_zps1afecd4b.jpg
Slide a bead onto both of the ends and tie a knot. Then snip off the excess. And you are done!


the DIY: STRING FEATHER NECKLACE

 photo DSC_0975_zps9570689f.jpg
To make this necklace, you will need:
- Embroidery Thread/String
- Wire
- Wire Cutters
- Scissors
- Mod Podge
- Paintbrush
- Wax Paper
- Chain
- Jump Ring
 photo DSC_0917_zps09aeafc0.jpg
Cut a strip of Wire, this is 18 gauge.
 photo DSC_0918_zpsdd380348.jpg
This piece is about 4 inches long.
 photo DSC_0919_zps88ff11b4.jpg
Curve the end of the wire into a loop.
 photo DSC_0921_zps42a7b077.jpg
Choose whatever colors you want your feather to be.
 photo DSC_0923_zps0b9e8930.jpg
Cut strips of your embroidery string about 4 inches long.
 photo DSC_0925_zps883b71d6.jpg
Tie a piece of string around the wire, making the knot right in the middle of the string.
 photo DSC_0927_zps0cab9259.jpg
Repeat over and over with the strings.
 photo DSC_0930_zps35a564a8.jpg
Put the strings and wire on wax paper for easy clean up.
 photo DSC_0931_zps9e83f994.jpg
Brush the strings downward with Mod Podge to create a feather-like shape.
 photo DSC_0970_zpsec98b361.jpg
After the strings have dried a little, turn the feather over and brush again with Mod Podge.
 photo DSC_0971_zpscc147cf7.jpg
When the strings have dried, cut them into the shape of a feather and snip off the extra wire.
 photo DSC_0973_zps5e160f5d.jpg
Connect the feather to a jump ring and then to chain.
 photo DSC_0974_zps4dddc948.jpg
 photo DSC_0976_zps0e1652b9.jpg
And you're done!

the DIY: 5 MINUTE NECKLACE

The name of this DIY is suiting since recently it seems like there just isn't enough time. Getting ready to move into a different house seems to come along with 10,000 new house projects and decoration ideas and I just can't find enough time to do all of them. We found this pack of flat corner irons while going through some old stuff the other day. I decided to make a quick necklace with these "V" shaped metal pieces. Also, they're super super old so you could call this a semi-vintage neckalce if you really wanted to. It literally took about 5 minutes to make this necklace.
 photo e8238697-0954-4282-a040-4d2294409430_zpsf3f7de71.jpg
You will need:
- a flat corner iron, in whatever size you'd like
- chain
- 4 jump rings
- lobster clasp
 photo bd933859-b25b-4792-9253-0d335d0d5989_zps680765de.jpg photo 1b0df862-9d8c-4be6-8693-4546083d0933_zps20f23174.jpg
Cut the chain to the length you want.
 photo 6ecc3813-a35d-4ca5-b990-7668e8812e1f_zps2cbf9082.jpg
Attach the ends of the chain to the flat corner iron with jump rings.
 photo ed702749-70c4-4012-afa1-9e9f99580125_zpsbcfaa4d5.jpg
Cut the chain open in the middle back part of the necklace.
 photo 2dacaf64-fe18-48c2-8571-c0b1d1b7fb03_zps89a33aee.jpg
Attach a jump ring to one end and attach a lobster claw (with a jump ring) to the other end.
 photo c6c36e11-4500-4d36-8a8e-8d16e7a6a50d_zps61ce084c.jpg
Close up the back of the necklace and you are done!
 photo 6a0fd88e-b11e-4dfa-bdbe-c136a1305fa4_zpsafbc0380.jpg
You can make this necklace as short or as long as you'd like and you could get smaller pieces. We may try different versions of this necklace with other sizes and we may even experiment with some spray paint. We will see what happens!