
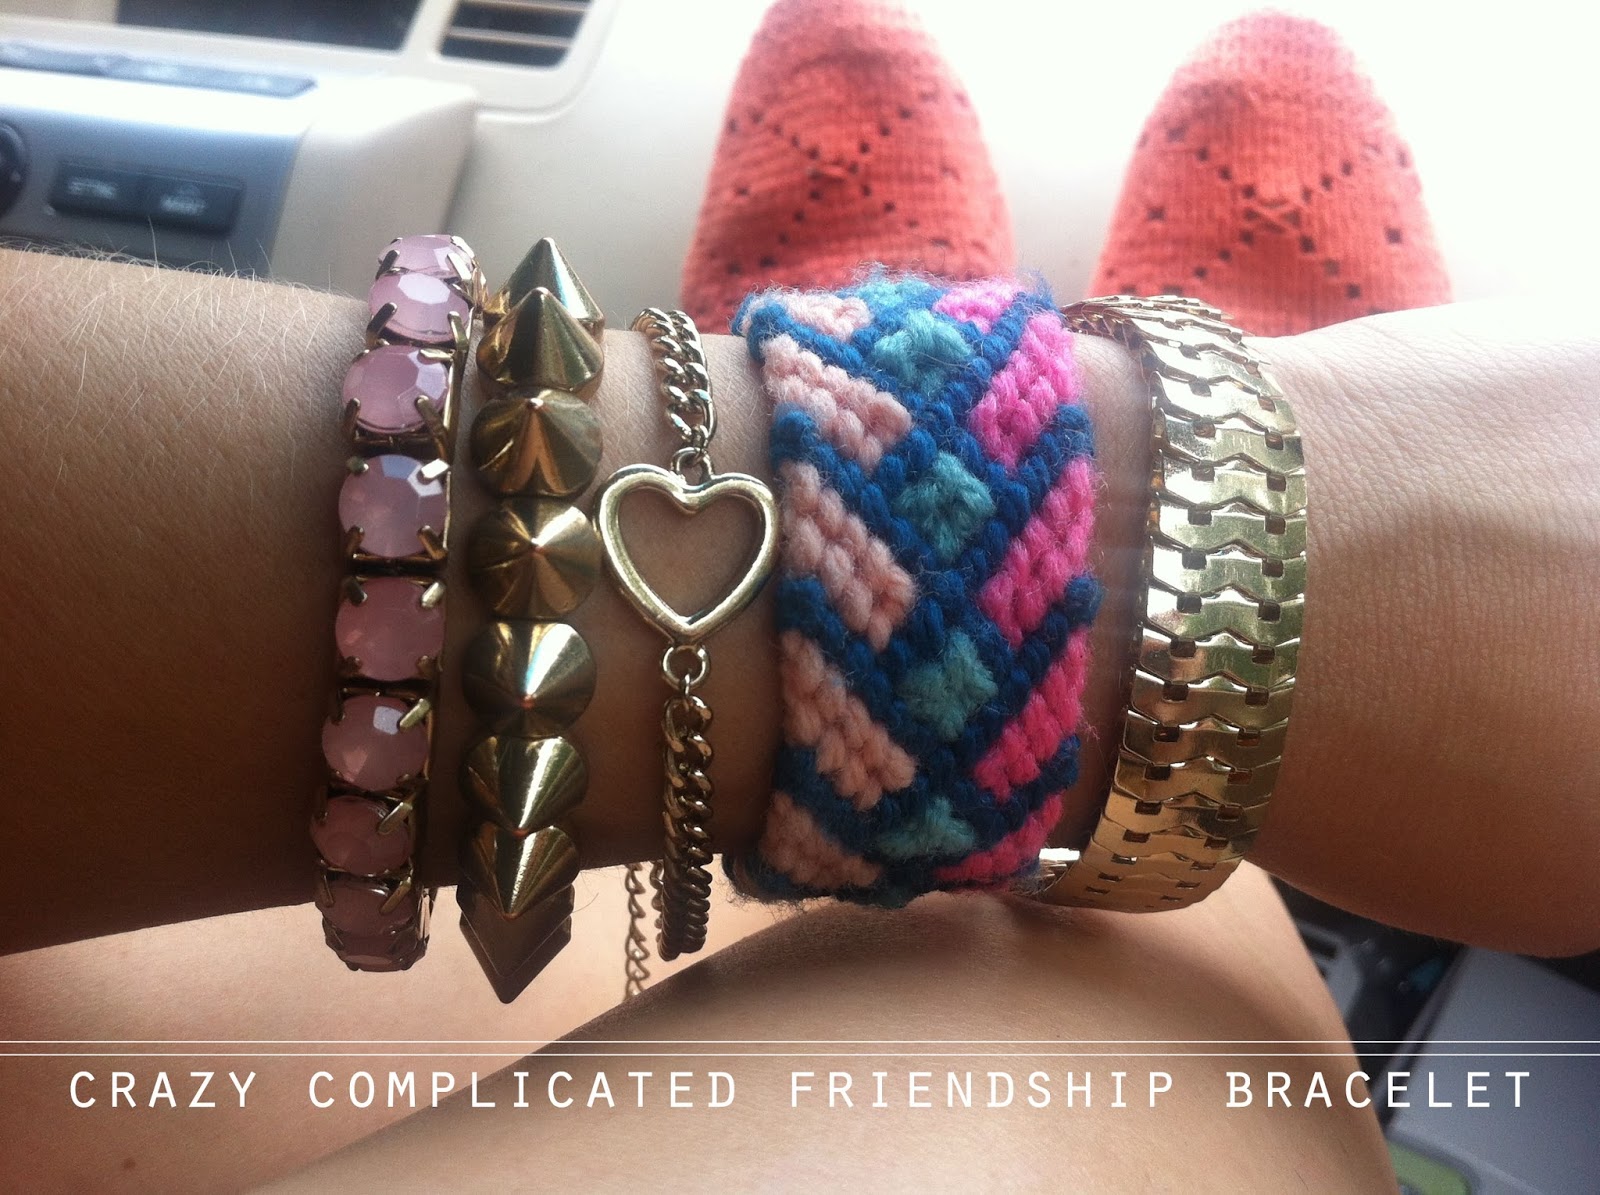
As I'm writing this, I think about how I could just cry about trying to explain this bracelet to you. We had a reader request that we try to recreate a friendship bracelet that she had found and while we usually don't take requests, I was intrigued by this particular bracelet. I had to have one of my own, that I created on my own. I spent two days trying to figure it out and let me just say, this bracelet is NOT for amateurs. If you are looking for something easier, check out our new DIY friendship bracelet that takes about 15 minutes here.
You may also like:
- The Fastest Friendship Bracelet Ever
- DIY Fishtail Friendship Bracelet
- DIY Heart Friendship Bracelets
- The Original Fishtail Friendship Bracelet
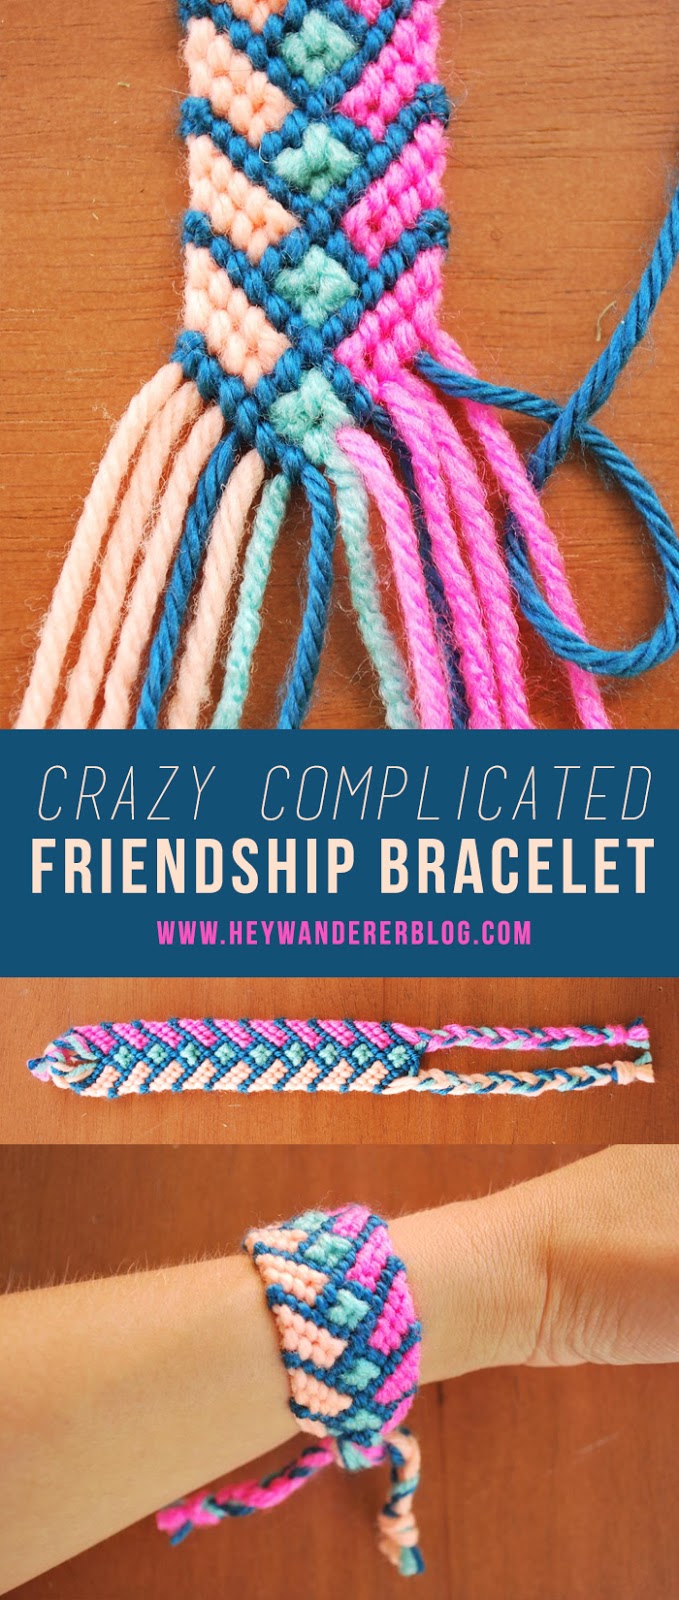
If you can't make a chevron friendship bracelet with your eyes closed, you probably should not attempt this tutorial. It may end in utter confusion and tears may be involved. Anyhow, if you dare to proceed reading this post, make sure you know what forwards and backwards knots are. It will be super helpful. Also, I start explaining from the middle of the bracelet because the bracelet looks crazy in the beginning. When you start, I recommend not tying a knot but wrapping some tape around the group of string. That way you will be able to finish both ends of the bracelet the same way, allowing it to lay flat on your wrist.
You may also like:
- The Fastest Friendship Bracelet Ever
- DIY Fishtail Friendship Bracelet
- DIY Heart Friendship Bracelets
- The Original Fishtail Friendship Bracelet
If you can't make a chevron friendship bracelet with your eyes closed, you probably should not attempt this tutorial. It may end in utter confusion and tears may be involved. Anyhow, if you dare to proceed reading this post, make sure you know what forwards and backwards knots are. It will be super helpful. Also, I start explaining from the middle of the bracelet because the bracelet looks crazy in the beginning. When you start, I recommend not tying a knot but wrapping some tape around the group of string. That way you will be able to finish both ends of the bracelet the same way, allowing it to lay flat on your wrist.
So you will need 4 colors of string. Also, I used yarn. It's way faster than friendship thread and it's harder to mess this bracelet up.


The first picture shows the order your strings should be in. Start tying forward knots with the string furthest left. Move inward for 4 strings. The 5th knot you tie will be a backward knot on the (in this case) light blue string.


You should now have 5 knots, a nice little row of peach. Now you will repeat on the opposite side with opposite knots. Start with the furthermost string on the right and tie backwards knots inward for 4 strings.


Tie a fifth knot on the next string, but make sure it's a forward knot.


Repeat the same thing on both sides but don't worry about the 5th knot this time. Only tie 4 knots and stop. Take the middle string (dark blue) and tie a backward knot to the left on two strings.


With the other middle string, tie two forward knots to the right. Take the new middle string on the left (light blue) and tie a forward knot on the other light blue string. With the light blue string on the right, tie a backward knot on the pink string to the left. It feels a little weird but it works.


With the light blue string on the left, tie a forward knot on the peach string. Again, weird but ya... you'll be doing this a lot on this bracelet.


Then with the light blue string on the left, tie a forward knot on the other light blue string. Taking the string that is second from the left, tie a forward knot on the outside string.


Then finish the row like a regular chevron bracelet. Forward knots all the way to the middle. Repeat this process on the right. Take the string that is second from the right and tie a backward knot on the outside piece of string.


Then finish with backward knots all the way to the middle and onto the other dark blue string. Repeat, repeat, repeat and you're almost done! I split the left over string into two sections and braided each section, finished with a knot.

I did the same at the beginning of my bracelet and then tied the braids together so there is a little opening for the end braids to fit into.


Phew... glad I made it through that one. I think I'll take a break from friendship bracelets for a while now. And if I can find jewelry findings big enough for this bracelet, I'll make it more removable, fa sho. If you like this post and would like to see more like it, please pin the image below!
xo, Savannah
**This post contains affiliate links.
cute bracelts!!!. come check out my latest post :)
ReplyDeletehttp://abeautifulheart07.blogspot.com/2013/08/truly-sweet.html
Cute, really nice! :)
ReplyDeleteThere is an easier way to deal with those weird knots. When you ask for a forward knot that feels weird, start with a backwards knot (which feels more natural) then finish off with the forward knot. The knot will look more like a normal friendship bracelet knot. Trust me it works! :D
ReplyDeleteThis was really easy to follow. I picked up the pattern very quickly. Thanks for your great instructions!
ReplyDeleteI really like frienship bracelet. I was making them almost all summer. :) And I want to recomend yo great link http://www.braceletbook.com/
ReplyDeleteI'll be glad if you visit my blog: www.veskrini.blogspot.com
ReplyDelete:) Thanks
I'm crazy about these stuff. too bad I run out of store here on where I can buy strings for those crafts :( loving this one! amazing!
ReplyDeletexx
ellie
http://chasingculprit.blogspot.com/
I would love to make this after I finish the bracelet I'm on now! What yarn do you use? Regular knitting yarn? If so is it a certain weight? A picture would be helpful
ReplyDeleteI use embroidery thread
DeleteI used embroidery thread too, works just as well. 😁
DeleteI guess I don't understand the order of the strings. I tried to use the picture as a guide...but then don't end up with 5 knots of my first color. Thanks!
ReplyDeletehey! i made this pattern a while back and liked it a lot. i am about to make it again, so i decided to transcribe in using a bracelet pattern program. just in case you want to see it, i posted it on mu tumblr (and credited you ofc): http://rococokara.tumblr.com/post/145566929396/rococokara-i-made-my-step-dad-a-macrame
ReplyDeleteI would love to see this pattern done up on friendship-bracelets.net. Also, you seem to be using only left knots and right knots, but no reverse knots. Was there a reason for that? I'm trying to puzzle it out.
ReplyDeleteAmazing design! However, I don't think much prior knowledge about friendship bracelets are required. I used regular friendship bracelet thread which worked just as fine, and the knots were easier since I double knotted them. The so-called "weird" knots became fairly simple... But thanks for sharing this!
ReplyDeleteIs there a pattern for this bracelet that I can follow? Or what is the name of this bracelet?
ReplyDeleteNice job on the bracelet! Gonna have to try this. And use lots of patience.
ReplyDeleteOriginaire de Normandie, je discutais sur un forum gastronomique lorsque j’ai repéré un lien furtif. En explorant plinko casino game glissé au milieu d’une recette de teurgoule, j’ai découvert un jeu de hasard captivant. Pas de scénario complexe : on lâche la bille et on admire la trajectoire. Après une série de défaites, j’ai failli quitter la partie, mais un ultime tour m’a rapporté suffisamment pour offrir une galette-saucisse à mes amis. Un petit divertissement simple qui pimente mes afterworks !
ReplyDeleteLaughed at Aussie skits on YouTube in Australia, mates sending me outback parodies. Wanted an online chuckle with stakes. Landed on Metaspins Casino , regulated down under. Slots like Book of Dead and video poker for giggles. By the way, support’s a hoot. App’s smooth, fast signup. Cracked a session later, kept the comedy vibe spinning merrily.
ReplyDeleteCan I put a pattern for this on Bracelet book?
ReplyDeleteLove the clarity and shine. silver moissanite tennis bracelet
ReplyDelete