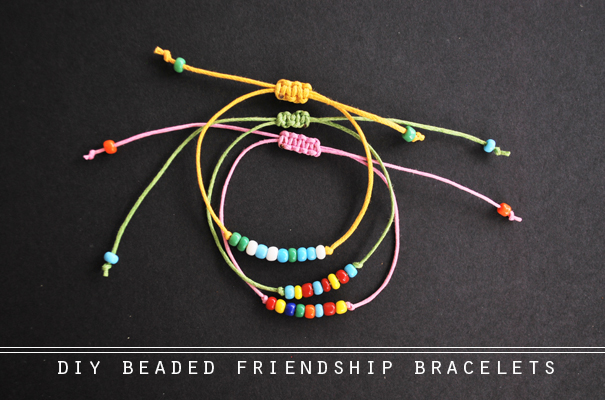
the diy: beaded friendship bracelets

I was inspired yesterday to make a bunch of bracelets but I only successfully made these guys. But, I really like how they turned out! They are super simple and quick and they could be customized in many ways. And you can give them away to your friends without feeling like your giving your soul and hours of hard work away with it. You know, those regular friendship bracelets are so cute but geez, can I get my day back? Anyway, here's what you do...
 photo DSC_0492_zpsb2627756.jpg photo DSC_0494_zps40fc5673.jpg
All you will need is braiding cord and a few smaller beads. You basically need a bead that is big enough to easily slide on the cord but, still small. Cut a piece of thread about a foot long. Tie a knot close to the middle of the strand.
 photo DSC_0495_zps3a90ca1f.jpg photo DSC_0498_zps99ffa49e.jpg
Slide the beads on in whatever order you would like. I used 8 beads. Tie a knot on the other end of the beads. Overlap the ends of the strands around each other.
 photo DSC_0499_zpsc08163ef.jpg photo DSC_0500_zps8e3fc61e.jpg
Cut another strand of cord and wrap it around the overlapped strands. Tie a forward knot to start.
 photo DSC_0501_zps2eb581e7.jpg photo DSC_0502_zps5737b902.jpg
Then tie a backward knot.
 photo DSC_0503_zps6aea0113.jpg photo DSC_0506_zps4c15c94b.jpg
Alternate back and forth about 8 times. Snip the ends off and burn them with a lighter.
 photo DSC_0509_zpsec120f14.jpg photo DSC_0510_zps1afecd4b.jpg
Slide a bead onto both of the ends and tie a knot. Then snip off the excess. And you are done!


the DIY: PHOTO MOBILE WITH PRINTIC

Well, I've been seeing DIY videos forever and there are some really cool looking videos out there. I always thought it'd be soooo much work to make one so we never even tried to do one. Turns out, it's actually pretty stinkin' easy. The problem with this video is that when I recorded it, it recorded in time lapse form the WHOLE time. So, the video isn't exactly what I wanted it to be but at least we've done one now and we'll be able to do more in the future, now that we know how easy it is!
 photo 029ec74b-e993-4b4c-83f1-29745a9d83f3_zpsf8a2b829.jpg
We've teamed up with Printic to bring you this tutorial. Printic is an app that let's you easily print out your instagram pictures right from your phone. They also look like polaroids- bonus! Anyways, check out their app and order you some photos ASAP. And then you can make this awesome photo mobile!


the DIY: CARDBOARD EARRINGS WITH OZ THE GREAT AND POWERFUL

We recently watched Oz the Great & Powerful and have done a tutorial that is inspired by the movie, Glinda specifically. This movie has so many great costumes and accessories, our first thoughts were to create something that we would wear while exploring the land of Oz.
We loved Glinda's crown so we decided to make an earring version of it. To make these earrings you will need:
- Carboard
- Scissors
- A Writing Utensil
- French Ear Wire Fixings (a.k.a. the earring things)
- Gold and Silver Spray Paint
- Quick Dry Tacky Glue
- A Push Pin

First, gather some cardboard, we just cut off some from a small box we had.

Peel off the top layer of paper on the cardboard. Be gentle so you don't bend the bottom.

Your cardboard should look like this.

Draw shapes on the back of the cardboard. Glinda's crown had a lot of elongated pentagons so, that was the main shape we were using. We also cut out a diamond shape. Just eyeball this part. Make sure that the shapes are drawn parallel to the corrugated-ness on the back. I messed this up the first time.

Cut out the shapes.

Spray paint the shapes sliver first and then add a little touch of gold on the bottoms. You're creating an ombre effect.
Put tacky glue on the backs of the diamond shapes, on the bottom half.
Glue them down over the pentagons.
Use a push pin to poke holes at the top of the earrings.
Attach the French ear wire fixing.
And you are done! Now I want to try to make other projects with cardboard. These earrings are so big yet so light. And if you didn't know they were made from cardboard, you might even think they were fancy enough to be worn by Glinda herself.
And if you haven't already seen Oz the Great & Powerful, you can buy the Blu-Ray Combo Pack here!

Follow Oz the Great & Powerful!
Facebook / Twitter / Pinterest